Brisket recipe making can be simple and easy or hard depending on the time, skill and attention to detail that one pays. And if you can make it for one then there's no end to the amount or types of brisket you can make. We've made a number of briskets over the years and while we can't say that we are the Grand Champions, we can say that our brisket recipe has been loved by hundreds of followers and friends. To that end we wanted to give you our simple process for making brisket. Brisket is very popular now but an average cut of brisket can weigh in the 10 to 20 pound range costing upwards of $50 to $100. It's great if you're an average family of 4 or 5 but what if it's just you and maybe one other person. That would mean that 20 pound brisket would last you for a couple of weeks and after about three days I can tell you that you will be completely done with having brisket.
So, let's spend some time on a process we call "Brisket for One" or maybe "Two". First things first, select the best brisket you can find. One key point we want known is that we believe that brisket responds better when it is chilled. If the brisket is brought to room temperature the meat can get a bit mushy making it harder to cut especially where the fat is concern.
Using standard terms a brisket is typically divided into two main sections, the flat and the point. The point is usually the thicker, fatter segment of the brisket with the thinner segment being known as the point. Depending on the amount of fat on the backside of the brisket you will need to trim at least a 1/4 inch of the fat. Then trim the silver skin on the other side of the brisket. If there is a section known as the "deckle" which is technically the pointy section on the top of the point which in some ways looks like a fin on a fish. You will want to trim back about 1/2 of that deckle. This section is usually where "burnt ends" come from. But for our purposes most of that section will be removed and discarded.
When you've taken off about all the fat that you think is necessary now comes the decision point. As a comment we want to make sure that you don't completely skin the brisket. Brisket like tri-tip needs some fat to work through the grilling process. If you remove too much fat then you make the meat more vulnerable to burning even with the rub added. So, let's be careful about the amount of trimming that goes on.
Let's get to the Brisket Recipe for One step. This is where we divide the brisket recipe into two sections. Let's take the brisket and check for the transition point between the point and the flat. Right about that point let's use a very sharp knife to cut across the brisket to segment it into two. The second decision point is deciding which segment of brisket you will actually barbecue. In the truest sense of the word barbecue because we are going to barbecue the meat for a relatively long period. In fact we will be barbecuing the meat at the rate of 1-1/2 hours per pound. So, if we've got a 10 pound brisket and we cut the meat about half way across leaving 5 pounds on either side then we will need at least 7-1/2 hours to barbecue our brisket.
So, let's prep both sides of the brisket. Actually you can prep the brisket with Dry Rub before cutting it in half. No matter, we'll be using our long standing favorite Jake's Famous Pure Santa Maria Dry Rub. This is a simple dry rub that uses Kosher smoked salt, Coarse ground black pepper, Granulated Garlic and Parsley. This Santa Maria Style rub is spread evenly over the entire brisket. Now, for best results we'll be pressing the rub into the meat. We won't necessarily be rubbing the meat but we will be pressing the dry rub in all the same.
Now with the segment you've chosen to save you can bag or wrap that up and store it in your freezer. Remember once this brisket is done it will last at least 4 to 5 days especially if you're one person.
Earlier we mentioned that the brisket will take about 7-1/2 hours to barbecue. Just some simple calculations will tell you that without resting time we should consider getting the brisket going around 7 AM. We'll want to have a temperature in the grill at 250 degrees. We will also want to have some smoke added into the cooking process. But let's not over do it with smoke. We've found that smoke is the best when there's about 5 to 8 ounces of wood chips laid across the coals during the cooking process. We prefer Red Oak but you can use Pecan or Hickory or Peach whatever your favorite wood.
Moisture, it's a good idea to think about moisture as well. Brisket can get dry if not properly managed especially if your fire gets too hot. A special item to keep an eye on is noting that when the wood burns it will drive up the temperature by a minimum of 10 degrees. One way to slow the rising temperature is by soaking the wood chips for about an hour before usage. Additionally let's get a small metal pan or bowl filled with water placed next to the brisket and near the heat but not directly over the heat. We want nice rising steam not bubbling steam. Bubbling will dry the water out which will mean that you'll need to keep raising or removing the lid to restore fresh water. The other downside to bubbling is that the more times you remove the lid the more times you remove heat from the grill. Just think of adding 10 minutes to the cook process each time the lid is removed.
Additional forms of moisture come from a spray bottle filled with either Worcestershire sauce and water a 50/50 mix or a mixture of Apple Cider vinegar, apple juice and water. I like using the Apple Juice and orange juice combination. The combination mixes well and doesn't overpower the flavor of the meat.
We touched lightly on the heat but we're going to spend a little more time with it here. We'll be using an 18 inch Weber grill. This is a charcoal grill and as we say "old school" barbecue method. We very much enjoy the real process of managing the charcoals and the timing of the meats this way. Let's focus in on using the "snake method" of laying out the charcoals. This method means that you'll be laying down three unit triangles of charcoals with two on the bottom and one on the top. So, we'll layer out the charcoals with the two units about 3/4 of the way around the grill. Then we'll follow that by placing one charcoal briquette on top of each two unit section of briquettes until they effectively form triangles. Leave about 8 inches clear between the start of the charcoal snake and the tail of the snake.
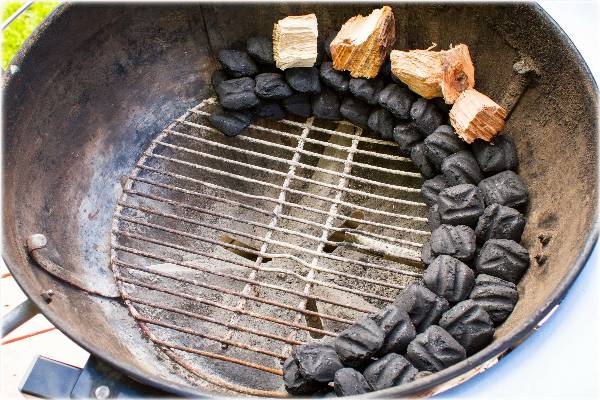
Now take about 10 briquettes and place those in a charcoal chimney if you have one. Use standard newspaper to start the charcoal. Let the charcoal burn down until you start to see the red hot glow between the briquettes. This charcoal process will take about 25 minutes to burn down. Once ready pour out the charcoal in the center of the grill. With long tongs one by one place the charcoal at the head of the snake building on additional rows. Once completed allow the charcoal to burn for about 5 minutes without the lid on the grill. After 5 minutes add a temperature probe to the grill then place the lid on the grill. With the vents wide open on the bottom and top of the grill begin checking the temperature after about 8 to 10 minutes. This 10 minutes window will give the newly added charcoal time to settle in while the adjacent charcoal begins to burn. Keep in mind we are looking for a grill temperature of 250 degrees.
Note, sometimes the fire might burn hotter than planned. There are a couple of ways to manage the excessive heat. The first standard way is by limiting the amount of air circulating in the grill. You can notch down the bottom vents by 1/2 to starve the charcoals of oxygen thus lowering the overall temperature. Second you can notch down the top vents which will burn up all of the oxygen contained in the grill which will ultimately lower the temperature of the grill. I find the fastest and simplest way to lower the start up heat is to just remove 1/2 of the charcoal we started with. Take out about 5 coals and place them in a metal container. Allow those charcoals to burn down away from the grill. Do not place the charcoal in paper, plastic or any other container that will melt or burn or will transfer high heat without protection.
With the temperature at 250 degrees let's get the brisket on the grill. One thing before we move that brisket is to say that we like resting the meat at room temperature about 1/2 hour before the grill process. This gives the meat time to relax and makes it easier to start into the grill process. Colder meat will take longer to grill. Now, we suggest placing the brisket opposite the main fire with the fat side up. Put the water tray as close to the brisket as possible but not completely over the coals. Now place the second temperature probe into the brisket. Set your clock for 7-1/2 hours. Keep in mind that if the temperature rises too much you'll need to adjust the vents to manage the airflow. It's also a good idea to check the water pan in about 2 hours. Depending on the size of the water pan you may need to check the pan more frequently, say every hour. Each time you remove the lid to check the temperature remember to add 10 minutes into the cooking time.
With the lid off it's also a good time to add external moisture to the meat. Take your sprayer and spritz the meat all around. Do not turn the meat over just spritz enough liquid to add back some flavor.
At about 5 hours in check the status of the charcoal and the placement of the brisket. As the snake burns around re-position the brisket away from the heat source. Adjust the position of the water pan and keep an eye on the internal temperature of the meat.
Our desired internal temperature is 195 to 200 degrees. Sometimes in the cooking process you can encounter the "stall". That is commonly know as the point at which tissue and fats transition in the meat. The actual stall can be measured by noting that the meat will reach about 150 degrees and won't climb one degree more for sometimes an hour or so. Eventually this stall will break down and higher temperatures will occur. That's why it's so important to have a good moisture source when grilling.
Note, if you burn through more charcoal and still have time left either on the internal temperature or you've run out of charcoal then add in more charcoal. Move the grill plate aside and add in about 20 briquettes. Try to stack them in a similar fashion but keep in mind you're adding them at the back end of the snake. This additional charcoal will add about 1 to two more hours in the grilling session. If more are needed simply add more as necessary.
Now with the internal temperature reached comes a really important step....resting. Remove the brisket and wrap in butcher paper or aluminum foil and place in a cool dry place like your oven. Crack the door open just slightly and allow the brisket to rest for a minimum of 1 hour to 2 hours. After the resting period remove the brisket.
With the brisket removed place on a cutting board or long tray. Take a sharp knife and cut across the brisket recipe inspecting the smoke ring and the level of doneness throughout the first cuts. Continue slicing as desired until you have enough of the meat on your plate.
Now comes the really good part. Taste the meat to see if you've achieved brisket nirvana. The meat should be amazingly tender with a wonderful peppery, salty, smoky taste. The end result should be absolute perfection.
As for sides, we like potato salad, coleslaw, salsa, or Chimichurri sauce. Additional compliments are barbecue sauce, garlic bread, asparagus and a host of other items.
We hope you've enjoyed this discussion andlearned a new skill and recipe for brisket for One or Two. If you don't have your own dry rub for brisket or brisket sauce you can always get ours. We make lots of products and dry rubs and brisket sauce are among our specialties. Check out our selection of brisket recipe sauces and dry rubs below. Add our special code Barbecue10 at checkout and receive 10% automatically off your order.
Tri Tip Steak and Rib Rub
Southwestern Hickory Rub
Awesome Carolina Rub
Santa Maria Dry Rub
Memphis Dry Rub
California Chicken Dry Rub
Really Good Mild Barbecue Sauce
Really Nice Medium Hot Barbecue Sauce
Really Hot Barbecue Sauce
Maple Bourbon Barbecue Sauce
Memphis Blues Barbecue Sauce
Just when you think it's over we've added in a video on making your own bbq sauces. Nothing is finer when you make your own brisket recipe yourself except in the cases when you can't then we hope you look to Jake's Famous Foods.
This product was added to our catalog on Wednesday 01 August, 2018.